This topic provides detailed information about the categories and tags that you can associate with your transactions.
You need to associate categories with your financial transactions. This is because categorized transactions drive key features such as reports, graphs, tax reporting, and budgets.
Tags add another layer of classification to help you manage your transactions and view reports. Although optional, they are useful in many situations. Learn more about categories, tags, and the differences between them.
Categories
Customize categories to fit your needs
Quicken provides a comprehensive list of default categories that have been developed over many years. The list covers the needs of the typical household such as common spending, income, investing, etc. However, you have the option to customize the category list to fit your specific needs. You can create new categories and subcategories, rename existing ones, or delete the ones you don't need.
That said, we recommend that new customers start by using the default categories. This is especially important when you are using connected services to download transactions. These downloaded transactions are automatically categorized so you do not need to manually categorize transactions. Using the default category list will result in better automatic categorization. As you become more familiar with the capabilities of Quicken and you start having different needs, you can create new categories.
Finally, don't worry about something going wrong. Quicken makes it easy to bulk re-categorize many transactions at once or change your existing category structure.
Create new categories
You have the following options to create new categories:
- When entering a new transaction: Enter the name of the new category in the Category field. The new category is automatically created when you save the transaction.
- In the Category field, click Edit Categories... In the Categories window, select New Category. Provide the required information and click Save.
- In Quicken, choose Window → Categories and create a new category as described in the above option.
Once the new category is created, you can associate it with your transactions. If the category is for a tax-related income or expense, you can optionally assign tax line items to categories, which will then be used to populate the Tax Summary report.
Create new subcategories
You have the following options to create new subcategories:
- When entering a new transaction: In the Category field, enter the name of the top-level category followed by a colon (:) and the name of the new subcategory. The new subcategory is created within the top-level category when you save the transaction. For example, Entertainment:Concerts, in which Entertainment is the category and Concerts is the subcategory.
- In the Category field, click Edit Categories... In the Categories window, select New Subcategory. Provide the required information and click Save.
- In Quicken, choose Window → Categories and create a new subcategory as described in the above option.
Once the new subcategory is created, you can associate it with your transactions. If the subcategory is for a tax-related income or expense, you can optionally assign tax line items to categories, which will then be used to populate the Tax Summary report.
Remove unused categories and subcategories
Quicken provides a comprehensive list of default categories and subcategories. However, if you are not using some of them, you can remove the unused ones from the list. To do this:
- In Quicken, choose Window menu → Categories.

- In the Categories window, click the Action icon.
- Select Remove Unused Categories.
Re-arrange your categories
Quicken gives you the flexibility to change a category to a subcategory and vice-versa.
If you are using mobile and web sync, we recommend that that you sync just before and immediately after re-arranging your categories. This is to avoid any conflicts later and to ensure that you get the updated categories on your mobile.
- In Quicken, choose Window menu → Categories.

- Drag and drop one category into another to make it a subcategory.
- Drag and drop a subcategory out of a category to make it a top-level category.
Tags
What are tags?
Tags provide an additional way to classify and group your transactions. They help you group and analyze all transactions related to a specific event. Let's understand this with an example.
You went on a vacation with your family and you need to keep track of all the expenses related to this vacation. It's very easy using tags! Just create the tag vacation and associate all your related transactions, from multiple categories, with this tag. Here are some transactions that you might associate with this tag:
- Dinner: Categorized as Food & Dining
- Fuel: Categorized as Auto & Transport
- Clothing: Categorized as Shopping
Later, to see the total cost of your vacation, run a custom report by including all transactions with the vacation tag.
Learn about creating, editing, and deleting tags to fit your needs.
Create new tags
You have the following options to create new tags:
- When entering a new transaction: In the Tag field, enter the name of the new tag. The tag is automatically created when you save the transaction.
- In the Tags field, click Edit Tags... In the Tags window, select New Tag. Provide the required information and click Save.
- In Quicken, choose Window menu → Tags and create a new tag as described in the above option.
Remove unused tags
Quicken provides a comprehensive list of default tags. However, if you are sure that you will not use some of them, you have the option to remove them from the list. To do this:
- In Quicken, choose Window menu → Tags.
- In the Tags window, click the Action icon.
- Select Remove Unused Tags.

View unused tags
To see if you have tags that are not currently used (not associated with a transaction):
- In Quicken, choose Window menu → Tags.
- In the Tags window, click the Action icon.
- Select Show Only Unused Tags.
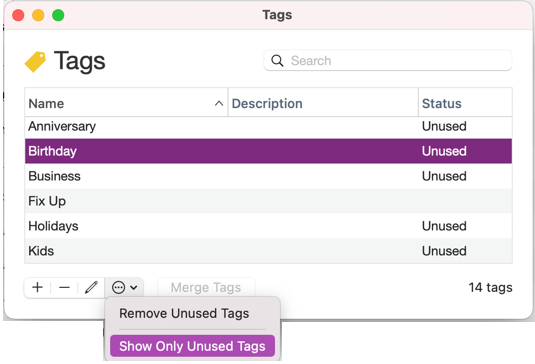
To restore the complete tag list, deselect the option Show Only Unused Tags.
Overview
Content Tools