Check Pay is a way to automatically send payments by check through the Quicken application. Unlike our check printing feature, this service sends the actual payment. You set the financial institution and the payee. Quicken sends the check using our service, Check Pay. Through our tool you can set your financial institution, add a payee, confirm the address, send a payment, and verify that the payment has been sent.
Not Available in Canada
This service is unavailable for users of our Canadian products.
Check Pay makes mailing a check to anyone nationwide fast and easy. You need to enter the name, address, and amount into Quicken, and we’ll automate printing, stuffing, and mailing a check drawn off of your own checking account.
To use Check Pay to pay a bill, you must first set up Check Pay.
Set up Check Pay for new manual bills
When you create a new manual bill, you have the option to allow paying with Check Pay. To allow Check Pay for a new manual bill:
- Select the Bills & Income tab.
- Select +.
- Select Manual Bill. The Add Bill Reminder screen will appear.
- Enter the name of who you want to Pay to. As you enter the name, Quicken displays a list of past payees to choose from.
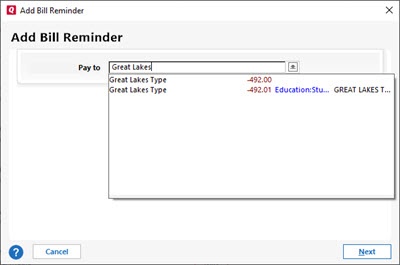
- Once you have entered the name, select Next.
- On the Add Bill Reminder screen, enter the appropriate information:
- Due Next On: When your next bill is due.
- Amount Due: How much you expect to send. This amount may vary for some of your bills, but the amount can be changed when you send the actual payment.
- From Account: Choose the bank account you want to pay from, usually your checking account.
- Click Add category, tag or memo to add additional information about the transaction.

- Select Optional Settings, then Allow paying with Check Pay.

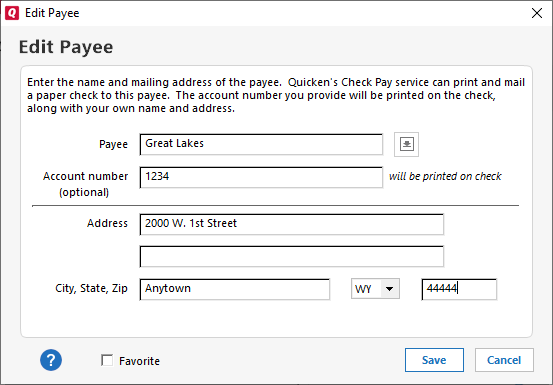
- The Edit Payee screen will appear. Provide the following information:
- Payee: The name of the person or biller receiving the payment.
- Account Number: This is the account number of your payee. This field is optional but is helpful when making payments to an account.
- Address: The address where the check will be delivered to the payee.
- City, State and Zip: These fields need to be entered correctly to deliver the check to the payee.
- You will be prompted to verify the address you have given. Review your address and select Done.
- Select Done on the Add Bill Reminder screen.
The new bill will appear on the Biller list with the default action Pay (Check Pay).
Set up Check Pay for existing manual bills
If you already have created a manual bill and want to pay the bill using Check Pay, you need to choose to Allow paying with Check Pay. To allow Check Pay for an existing manual bill:
- Select the Bills & Income tab.
- Find the payee on the Biller list.
- From the Action list, select Edit the instance and all future instances.
- On the Edit Bill Reminder screen, select Allow paying with Check Pay. You can choose from any account you have enabled for Check Pay.
- Provide the following information:
- Payee: The name of the person or biller receiving the payment.
- Account Number: This is the account number of your payee. This field is optional but is helpful when making payments to an account.
- Address: The address where the check will be delivered to the payee.
- City, State and Zip: These fields need to be entered correctly to deliver the check to the payee.
- You will be prompted to verify the address you have given. Review your address and select Done.
- Select Done on the Add Bill Reminder screen.
On the Biller list, you will see that the default action for that bill is Pay (Check Pay).
Overview
Content Tools