Not Available in Canada
This service is unavailable for users of our Canadian products.
Check Pay is a way to automatically send payments by check through the Quicken application. Unlike our check printing feature, this service sends the actual payment. You set the financial institution and the payee. Quicken sends the check using our service, Check Pay. Through our tool you can set your financial institution, add a payee, confirm the address, send a payment, and verify that the payment has been sent.
Not Available in Canada
This service is unavailable for users of our Canadian products.
Quicken Bill Manager is used to display your upcoming bills (bill presentment) so that you can anticipate future payments and better manage your spending. As part of Quicken Bill Manager, you can use Quick Pay and Check Pay to send money to payees (pay your bills).
Quick Pay is a way to pay bills online through the Quicken application. The Quick Pay service sends payments electronically, transferring the money from your financial institution's account to your designated payee. Using Quicken, you can specify which financial institution you will use, designate the payee, track the payment, and confirm that the payment has been made.
Check Pay makes mailing a check to anyone nationwide fast and easy. Once you have set up Check Pay, you can send payments by entering the payee's name, payee's address, and the payment amount into Quicken. Quicken takes care of printing, stuffing, and mailing a check drawn off of your checking account. It is easiest to set up Check Pay during the setup for Quick Pay.
Quicken Bill Manager is designed to use your checking account, although it is also possible to use a savings account. You need to set up your account in Quicken before you can set up Quick Pay and Check Pay.
Adding an online bill
To set up Quick Pay and Check Pay, you will first need to add a bill. It is best to start with an Online Bill. If you have already added a bill, you can go directly to Setting up Quick Pay and Check Pay.
- Select the Bills & Income tab. Verify that you are in the Bills section under the Bills & Income tab.

- In the upper right corner of the Bills section, select +.

- Select Online Bill.
- Type in or select the name of your online biller.

For your online account, enter your login information. It may take some time to process the login and sync the account.

If an error occurs, check your login info and try again. You may want to log in to the payee's web site, just to be sure it accepts your information.
- Click Done when complete. Your bill is now linked, which means you can pay it through Quicken. The linked bill will appear on your Bills & Income page. Once you have at least one online account, see the next topic, Setting up Quick Pay and Check Pay.
Setting up Quick Pay and Check Pay
Once you have added a bill, you can begin the process of setting up Quick Pay and Check Pay.
- Select the Bills & Income tab. Verify that you are in the Bills section under the Bills & Income tab.
- In the upper right corner of the Bills section, select the gear icon.

- Select Set up Quicken Bill Manager.

If you have already set up one or more accounts with Quicken Bill Manager, select Payment Accounts.
- Review any instructions and the Acknowledgment.
- Choose an account from the list of Payment Accounts and select Enable.

- Enter the following information about your payment account. You may need to consult your bank to get the appropriate information.
- Routing number
- Account number
- Name
- Date of birth
- Address (The address you have listed with your bank)
City, State, Zip

Be sure your financial institution has your correct address information. People sometimes forget to update their address when they move.
Select Save.
The screen to enable Check Pay will appear. To enable Check Pay select Begin Verification. If you do not want to enable Check Pay, click Done.

Read through the screens telling you about Check Pay, then click Done.
Two small deposits ( also called micro-deposits) between $0.01–$0.99 will be deposited into your checking account in 1–3 business days from SP -Quicken. In the next step, you’ll need to enter these amounts to verify your account ownership. You can check your online bank account, or wait for the deposits to appear in the register.
- On the Quicken Dashboard, you will see a reminder link to verify your account such as Account needs verification for Check Pay.

- On the Payment Accounts for Bill Manager screen, select Verify.

- On the Verification screen, enter the two micro-deposit amounts from your account. It does not matter what order you enter them in.

- Select
 .
. - The Payment Accounts for Bill Manager screen will reappear. You will see a check mark under Enabled for Check Pay. Select Done.
You can now use both Quick Pay and Check Pay through Quicken.
For more information about Quick Pay, see About Quick Pay.
For more information about Check Pay, see About Check Pay.
Not Available in Canada
This service is unavailable for users of our Canadian products.
Check Pay makes mailing a check to anyone nationwide fast and easy. You need to enter the name, address, and amount into Quicken, and we’ll automate printing, stuffing, and mailing a check drawn off of your own checking account.
To use Check Pay to pay a bill, you must first set up Check Pay.
Set up Check Pay for new manual bills
When you create a new manual bill, you have the option to allow paying with Check Pay. To allow Check Pay for a new manual bill:
- Select the Bills & Income tab.
- Select +.
- Select Manual Bill. The Add Bill Reminder screen will appear.
- Enter the name of who you want to Pay to. As you enter the name, Quicken displays a list of past payees to choose from.
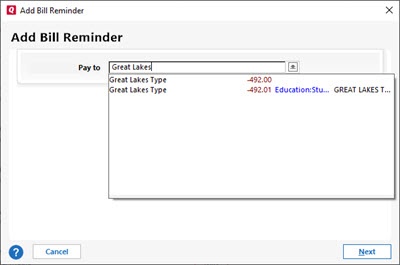
- Once you have entered the name, select Next.
- On the Add Bill Reminder screen, enter the appropriate information:
- Due Next On: When your next bill is due.
- Amount Due: How much you expect to send. This amount may vary for some of your bills, but the amount can be changed when you send the actual payment.
- From Account: Choose the bank account you want to pay from, usually your checking account.
- Click Add category, tag or memo to add additional information about the transaction.

- Select Optional Settings, then Allow paying with Check Pay.

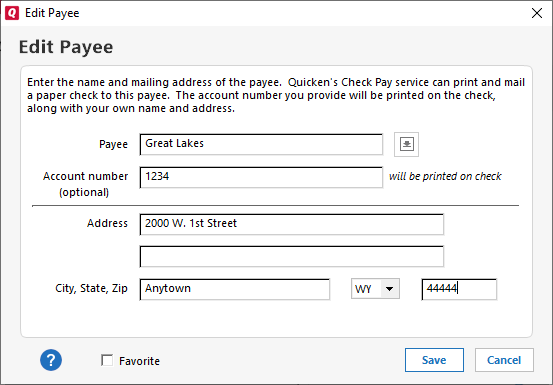
- The Edit Payee screen will appear. Provide the following information:
- Payee: The name of the person or biller receiving the payment.
- Account Number: This is the account number of your payee. This field is optional but is helpful when making payments to an account.
- Address: The address where the check will be delivered to the payee.
- City, State and Zip: These fields need to be entered correctly to deliver the check to the payee.
- You will be prompted to verify the address you have given. Review your address and select Done.
- Select Done on the Add Bill Reminder screen.
The new bill will appear on the Biller list with the default action Pay (Check Pay).
Set up Check Pay for existing manual bills
If you already have created a manual bill and want to pay the bill using Check Pay, you need to choose to Allow paying with Check Pay. To allow Check Pay for an existing manual bill:
- Select the Bills & Income tab.
- Find the payee on the Biller list.
- From the Action list, select Edit the instance and all future instances.
- On the Edit Bill Reminder screen, select Allow paying with Check Pay. You can choose from any account you have enabled for Check Pay.
- Provide the following information:
- Payee: The name of the person or biller receiving the payment.
- Account Number: This is the account number of your payee. This field is optional but is helpful when making payments to an account.
- Address: The address where the check will be delivered to the payee.
- City, State and Zip: These fields need to be entered correctly to deliver the check to the payee.
- You will be prompted to verify the address you have given. Review your address and select Done.
- Select Done on the Add Bill Reminder screen.
On the Biller list, you will see that the default action for that bill is Pay (Check Pay).
Overview
Content Tools